Tuesday, September 6, 2011

Spooktacular Halloween Cards!!

I took advantage of my day off (school closed due to flooding!! Wow!!) and put the Cricut Craft Room to the test once again.  I created these Halloween cards using my Imagine and the Craft Room.  I used the Cricut Pumpkin Carving cartridge and use the color palate to print out my basic colors.  I then adhered each square to some black or orange cardstock and then embellished with some sequins and orange glitter glue.  I also dressed up my pumpkins with a nice bow tie using ribbon from the Ribbon Boutique. The wonderful Halloween stickers are from remarks by American Crafts.  I think these cards turned out very nice.  My experience using the Craft Room today has been spooktacular!! Thanks for visiting!!
Patty

My First Cards Using Cricut Craft Room

Okay, I must admit, lately I've been devoting my time to my Yudu. But, this weekend, we got a monsoon of rain. Over a month's worth in two days!! This rainy weather has kept me inside and allowed me to do a little card making.  I was pleased to find that I actually got access to the Cricut Craft Room.  I encountered several "bridge errors" but managed to successfully print and cut two Christmas cards.  I used my Imagine Snow Angel cartridge for the backgrounds and designs and used Cricut Christmas Cards cartridge for the actual cards.  I really liked Cricut Craft Room.  I hope all the bugs get worked out very soon as I see lots of potential for this program.  I dressed up the cards with some diamond sequins and a little scrap of ribbon.  I had the "winter wonderland" sticker in my leftover drawer from last year, so I can't really remember what company makes them....I think Stampabilities...but not real sure!! Anyway I think these "first" cards came out pretty good and I look forward to using the Craft Room some more!!  Thanks for visiting!
Patty

Saturday, July 30, 2011

What I Can Do With the Yudu!!

Okay, I know that lately I have not been posting any handmade papercrafts, but I must admit I am an addict.  A craft addict that is!! I've told my mom it is a far better habit than smoking and drinking and she shruggingly agrees!!  After much research and hesitation, I ordered a Yudu.  There were about as many bad comments as good out there, but I thought with my crafty nature I would give it a try.  Yeah!! It works!!  My first application of the emulsion sheet and screen print were a success.  I made a couple of shirts, to wear, for the club I sponsor at school.  I embellished the stethoscope with some Tulip 3D glitter fabric paint.  I then got on the internet and started searching for free black and white clipart.  I found a link to the wonderful site Briar Press and used the little birdy image on my next two shirts.  They printed off beautifully with the Yudu black ink.  I will now go in search of an answer regarding heat setting, as I don't want these beautiful images to disappear in the wash!! If anyone has suggestions I would greatly appreciate them!! Thanks!!


Have a Great Weekend!!Patty

Saturday, July 9, 2011

Card and Gift Bag Combination

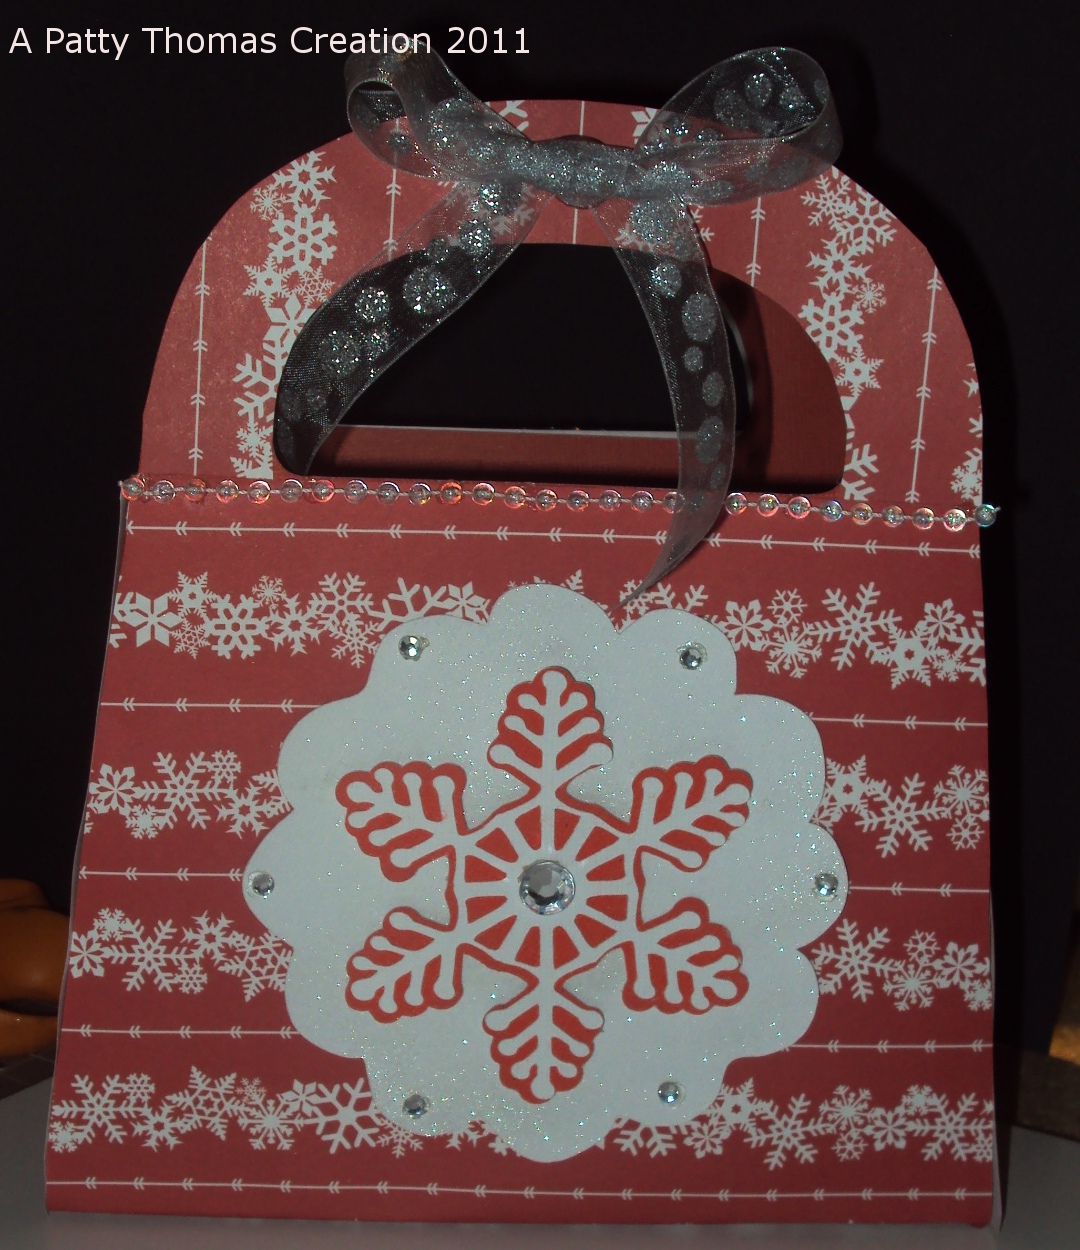
This week I've been busy working on some book reviews as part of my summer job, thus my cardmaking has gone slightly by the wayside.  Last night and today I gave my self a break and sat down with my Cricut Gypsy.  Back in the spring I took advantage of a deal to get seven free cartridges with the purchase of a Gypsy.  One of those cartridges was Tags, Bags, Boxes, and More.  I experimented last night making a couple of bags on the 12X12 mat.  I just wasn't pleased with their tiny size.  Perfect for a gift card or ring box, but not a sizeable bag.  I rustled up some 12X24 paper and went to work this morning.  The pictures show what I came up with.  Using the larger paper and mat, my gift bag is now around 7 1/2 inches wide by 6 inches tall (8 1/2 with the handle).  I found some wonderful plain "tag" cards in the dollar bin at Michael's and used one of those to create a matching card.  I really like these tag cards.  I always like to display my holiday cards and these have a prepunched hole perfect for hanging with ribbon or beads.    Okay here's my "recipe" for the bag and card:
Bag:
I used one piece of red 12X24 cardstock from The Paper Studio cut at 22.75 X 11.58 (these sizes were created on my Gypsy).  I then traced around the outside of the bag to put my snowflake pattern paper, from Recollections, in place.  This also gave the bag a little more stability.  Everything was put together using an Elmer's gluestick and Glue Dots to reinforce the bag seams. I embellished the outside by cutting a doily from the Cindyloo cartridge at 4.5 inches using white cardstock.  I sprayed the white cardstock with sparkle Sheer Shimmer Spritz.  I then cut a snowflake and background from the Winter Lace cartridge at 3.5 inches each. I added some sequins from Recollections and some bead trim and a bow.  The bead trim was from RibbonFx and the ribbon from the Ribbon Boutique.
The Card:
As I've already mentioned, the card comes from Studio G.  I adhered my snowflake patterned paper with a gluestick and then spritzed the exposed white area with sparkle Sheer Shimmer Spritz.  I used Cindyloo again to cut a doily at 2.8 inches.  Winter Lace provided me with the snowflake and background, cut at 1.8 and 2.1 inches respectively.  I then added the same theme with the bead trim, ribbon, and sequins, using Glue Dots to hold everything together. 

I know it's a little early for the holidays, but this crafting activity has me thinking of cooler weather as we hit 90+ temperatures and elevated humidity today!!
Have a wonderful rest of your weekend!!


Patty

Friday, July 1, 2011

My First Attempt At Welding......A Shaped Card That Is!!

Today I experimented with my Cricut Design Studio weld feature to create a shaped card.  I used the birdhouse and shadow from the April Showers Cricut Cartridge to create this card.  I first sized and welded the birdhouse shadow.  Each shadow was 5.3X6.0inches and was cut using a beautiful wood patterned paper from the DCWV Premium Photo Stack. I also cut a second image out of black cardstock to place behind the "wood" cardstock to give the card a little extra support.  Before I deleted the welded image from the Design Studio screen, I sized the birdhouse face to fit the front of the welded card. I also used the wood grained cardstock for this image.  After adhering all of the images together, I embellished with a few cute blossom and butterfly stickers that I found recently at my local Dollar Tree.  I then added a cute little diecut bird from DCWV.  I finished the card with some ribbon trim and a bow from the Ribbon Boutique and sprayed the card lightly with some sparkle Shimmer Spritz.  I left the inside blank as I think this card has numerous possibilities....birthday, housewarming, get well, etc.   Hope you like my first attempt at welding!! Thanks for looking.
Patty

Thursday, June 30, 2011

A Stinky Old Birthday!!

Card Exterior

Card Interior
Once I saw the image of the little skunk coming out of the outhouse on the new Cricut Campin Critters cartridge I just knew a "rotten" birthday card was on the way.  First let me say...I love my oldest sister to death....and she has a great sense of humor....so with that said I think she'll get a good chuckle out of my birthday card!  This was the first time I've used my new Cricut Imagine and I am ever so thankful that straight out of the box, it has worked perfectly (knocking on wood!).  I had read both good and bad reviews, but after an Ebay deal, I just couldn't pass it up ( you really didn't have to twist my arm either!!).  I use the Cricut Imagine Snapshot Nature cartridge for the coloring and the Campin Critters cartridge to cut the background for the mountains and grass (although my "big" grass looks more like a hayfield!!). I also used Give A Hoot for the tree and cloud.   I cut those images at three inches each.  I also used the Snapshot Nature cartridge for the wood on my outhouse.  The outhouse and skunk elements were also cut at three inches.  I just love how the Imagine lets me select colors and cut all elements on the same piece of white cardstock.  I printed the message out using my printer and plain white paper which I glued to cloud cardstock from the Premium Photo Stack from DCWV.  I then used some Pebbles chalk to add some shades of light blue to my printed message.  I used the same technique for the inner message. 
I think my sister will enjoy her "stinky" little card!! Have a wonderful weekend and thanks for stopping by!!

Patty

Wednesday, June 29, 2011

Happy Sweet 16!!

                            Card Exterior                                   
Card Interior
I whipped up this little card for my neice's sweet 16 birthday.  Again, I'm stuck on the beautiful doily images on the Cindy Loo Cricut cartridge.  I used those on the front of this card cut at 4.5, 3.5, and 3 inches for the doily and backgrounds.  I used the Wildcard cartridge to create the lettering. I was able to weld my e's together using Cricut Design Studio.  I had been wanting to try to weld letters/images and this was my first easy attempt and YEAH!! it worked!  The beautful paper is from Cloud 9 design and the ribbon is from Offray.  I used some pearl stick-on accents from the dollar bin at Michaels.  The stamped images are clear stamps from Inkadinkadoo and I used Adirondack ink in Cabin Fever to stamp the images.  I finished the card by spraying it with sparkle Shimmer Spritz.  The inside message is cut using a border punch from Fiskars.  It includes the same stamped images as the outside of the card as well as the pearl accents.  All card components are put together using regular and pop-up Glue Dots.  Thanks for stopping by and have a wonderful 4th of July!!