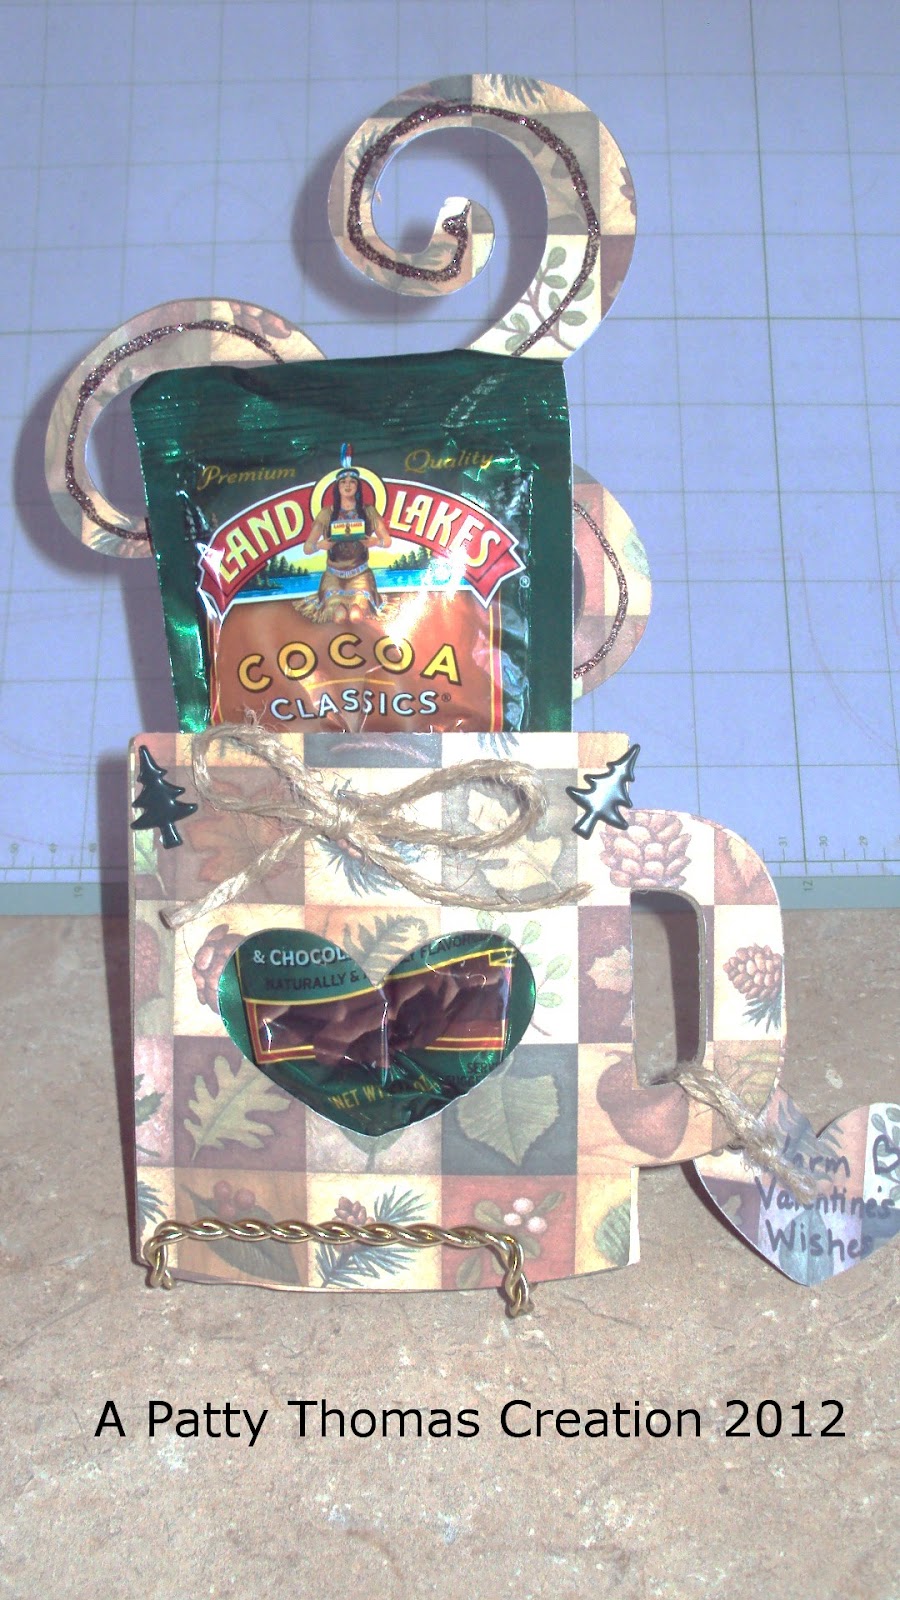
A few weeks ago I saw a post for hot cocoa mugs as Christmas favors on the Cricut Messageboard. I found this cute mug file on my Cricut Essentials cartridge, one of the built in cartridges on the Cricut Expression 2 machine. We are experiencing the coldest temperatures of the winter season right now, so I decided these warm cocoa filled cards would be appropriate for my Valentine's sweeties. The front of the mug, with the heart cut-out, and the back of the mug are cut on one mat at size 9.50. I cut two of each of these and layered them to provide strength to the card. I used my Scotch ATG gun to put them together. I added some glitter glue, coordinating brads, and a bow. I used the remaining heart cut-out to create a nice little tag, where I wrote my "Warm Valentine's Wishes" sentiment. I plan to add a few double-dipped chocolate peppermint sticks to stir up the wonderful flavors of hot cocoa. I used hearts and swirls paper from the Colorbok, Paper Studio, and the Disney Mega Paper Pads. I found some nice woodland themes, for the guys in the family, in the atd Great Outdoors stacks. Ribbon for the bows comes from jute twine, the Paper Studio, and some saved-for-me scraps from my wonderful mom, my biggest fan!! Hope you stay warm and have a very happy Valentine's day!! Thanks for stopping by!
Patty
Showing posts with label the Ribbon Boutique. Show all posts
Sunday, February 12, 2012
Saturday, January 21, 2012
Valentine's Cards Using Cricut Imagine
The Cricut Imagine makes it so easy to create quick cards. Sometimes my brain just gets tired of trying to come up with my own creative layouts, so the designs in the Imagine cartridges are just the trick!! I created two easy Valentine's Day cards using the Cricut Imagine More Cards and Better Together cartridges. I embellished each with sheer white ribbon from the Ribbon Boutique and add a few glitzy accents and stickers from my stash. The pink background papers are from the makingmemories Just Chillin' stack, on which I layered photo mats I had in my stash (sorry can't remember the maker and the package is long gone too!!). I used foam adhesive squares to add some dimension to the die cuts. Thanks for looking!!
Patty
Patty
A Simple Valentine
Today, for a rainy morning project, I decided to work on some pretty, but simple, Valentine's Day cards. I used my Cricut Love Struck 2010 cartridge and my Cricut Imagine machine to create this card. I used a pre-cut craft cardstock card as my background. I cut a small piece of white cardstock and embellished it with one of my Martha Stewart punches, onto which I adhered my Love Struck diecut and stamped my message. Afterwards, I added a simple ribbon and bow from ribbon by the Ribbon Boutique. This card was easy to create, but I'm sure it will win the heart of my Valentine!! Thanks for looking!
Patty
Patty
Monday, January 16, 2012
Embossing Thin Copper Sheeting With My Cuttlebug...........
I used my Cuttlebug and an embossing folder to create this birthday card. These thin copper squares can be found in the woodworking section of Hobby Lobby. I got them for Christmas and was anxious to emboss them. I used plain brown cardstock and ribbon from the Ribbon Boutique to top a pre-cut cream colored card. I also used some coordinating matching copper brads beside my stamped sentiment. I think the copper embossing turned out just lovely!!
Thanks for looking!!
Patty
Thanks for looking!!
Patty
Saturday, December 31, 2011
Cricut Imagine + Kate's Kitchen Cartridge+ Printable Vinyl=New Kitchen Canisters!!
I found a steal on these antique-looking kitchen canisters at my local craft store just before Christmas. I had an ideal in mind when I picked them up. I decided I would use my Cricut Imagine and the Kate's Kitchen cartridge to dress these tin canisters up just a little! I used the Cricut printable vinyl and sized the images between 3-5 inches depending on their respective canister size. It was an easy print, cut, and adhere to each canister. Afterwards, I used some country ribbon from the Ribbon Boutique to create a border and bow for each canister. This project took maybe ten minutes total to finish and completely transformed the look of these ordinary canisters!! Thanks for looking!
Patty
Patty
Wednesday, December 28, 2011
Winter Break Projects
Here are a couple of Winter Break projects. The first is a tote bag I made for my niece. She has been very sick and in the hospital. I used the Cricut Imagine Baby Boutique cartridge for the monogram, bird designs, and swirls, which are printed and cut on fusible fabric. I sewed a ribbon border using ribbon from the Ribbon Boutique. I embellished with pink and clear rhinestones using my Easy Glitzer. I created a matching bow also using ribbon from the Ribbon Boutique, I then found a cute rhinestone dragonfly pin to accent the bow.
The second project is an easy bookmark cut from the Animal Kingdom cartridge. This was my first wireless test cut using my Cricut Expression 2 machine and the Cricut Craftroom. I embellished the bookmark with brads from All My Memories. I add some coordinating buttons from Dress It Up. My name is formed from stickers from Colorbok. I colored my cardstock moose with my brown Copic marker. I think I'll make a few more of these for friends and relatives!
Thanks for looking and Happy New Years!!
The second project is an easy bookmark cut from the Animal Kingdom cartridge. This was my first wireless test cut using my Cricut Expression 2 machine and the Cricut Craftroom. I embellished the bookmark with brads from All My Memories. I add some coordinating buttons from Dress It Up. My name is formed from stickers from Colorbok. I colored my cardstock moose with my brown Copic marker. I think I'll make a few more of these for friends and relatives!
Thanks for looking and Happy New Years!!
Sunday, November 6, 2011
Cricut Imagine More Cards: Happy Birthday!!
I created a quick and simple birthday card using my Cricut Imagine and the Imagine More Cards cartridge. I used the print and cut feature and sized everything at four inches. I then separated my layers. I took a precut white card and used some blue polka dotted paper from the DCWV. I then used a photo cardstock background in a pretty pink pattern that I adhered to the paper using Glue-dots. I layered my diecuts using foam adhesive squares. I added a little glitz to my candle flame using orange glitter glue. I finished the card with a nice coordinating bow from the Ribbon Boutique and some glitzy sequins from a recent yard sale find! This birthday card took just a few minutes to make and I think it turned out very nice. Hmmm, my sister has a birthday this week...may have to put this one in the mail tomorrow!! Thanks for stopping by! Patty
Yeah!! My Imagine is back home.
I had to send my Cricut Imagine back to the factory a few weeks ago. Without hassle, the company sent me a new one and it came this past week. I was so thrilled to have the print and cut capabilities, that this machine offers, back. I came up with this card using designs from the Lori's Garden Cricut Imagine cartridge. I started with the precut, scalloped card. I then embossed it using my Cuttlebug and one of my wonderful embossing folders. From there I added some images cut from Lori's Garden, which I layered with adhesive, foam squares. I then added some faux flowers and pearl adhesives from Recollections. I glitzed the diecuts just a little with glitter glue. I strung some beads from The Ribbon Boutique, added a bow from my scrap stash, and finished the card off with an antique metal brad from Making Memories. I think I might of gotten a little carried away with all the "bling" on this card, but I think it also gives it sort of a Victorian look. Now I just have to find the right sentiment to go inside! Have a great week and thanks for stopping by! Patty
Sunday, September 18, 2011
Thanks "Sew" Much Card
Here is a thank you card made for my sister who gave me a really special birthday gift. I used my Country Life Cricut Cartridge for the die-cuts and my Best Friends Imagine Cartridge for the paper designs. I used Bazzill Basics Paper Premium Textured Cardstock for the card. I then adhered a square of Cloud 9 Design Specialty Double-Sided Cardstock for the flowered background. I then used a light blue precut photo mat by Heidi Grace. I adhered my die-cuts to the mat using foam adhesive squares. I shaded my quilt just a tad using my Copic Cadmium Yellow marker. I then embellished the die-cuts with silver glitter glue, for the needle, and my white Gelly Roll pen for the stitching. I cut my tag from the same Bazzill cardstock and border punched it with my Fiskars punch. I printed the wording off on plain, white paper and then used some Pebbles chalk to add some color. I used a regular ball point pen to create stitches around the tag and quilt. I topped this card off with a few buttons from my sewing stash, which are adhered with Glue Dots. I then added a bow made from ribbon from the Ribbon Boutique. I hope my sister likes her card as much as I liked my present!! Thanks for looking!
Patty
Tuesday, September 6, 2011
Spooktacular Halloween Cards!!
I took advantage of my day off (school closed due to flooding!! Wow!!) and put the Cricut Craft Room to the test once again. I created these Halloween cards using my Imagine and the Craft Room. I used the Cricut Pumpkin Carving cartridge and use the color palate to print out my basic colors. I then adhered each square to some black or orange cardstock and then embellished with some sequins and orange glitter glue. I also dressed up my pumpkins with a nice bow tie using ribbon from the Ribbon Boutique. The wonderful Halloween stickers are from remarks by American Crafts. I think these cards turned out very nice. My experience using the Craft Room today has been spooktacular!! Thanks for visiting!!
Patty
Patty
Friday, July 1, 2011
My First Attempt At Welding......A Shaped Card That Is!!
Today I experimented with my Cricut Design Studio weld feature to create a shaped card. I used the birdhouse and shadow from the April Showers Cricut Cartridge to create this card. I first sized and welded the birdhouse shadow. Each shadow was 5.3X6.0inches and was cut using a beautiful wood patterned paper from the DCWV Premium Photo Stack. I also cut a second image out of black cardstock to place behind the "wood" cardstock to give the card a little extra support. Before I deleted the welded image from the Design Studio screen, I sized the birdhouse face to fit the front of the welded card. I also used the wood grained cardstock for this image. After adhering all of the images together, I embellished with a few cute blossom and butterfly stickers that I found recently at my local Dollar Tree. I then added a cute little diecut bird from DCWV. I finished the card with some ribbon trim and a bow from the Ribbon Boutique and sprayed the card lightly with some sparkle Shimmer Spritz. I left the inside blank as I think this card has numerous possibilities....birthday, housewarming, get well, etc. Hope you like my first attempt at welding!! Thanks for looking.
Patty
Patty
Sunday, March 13, 2011
Who Loves Chocolate???
I've been looking for this Stampendous stamp for the longest and finally found it in stock this weekend at Michael's. My friends and family know my love for chocolate, or for that matter anything sweet, so I wanted to incorporate that love into a card. I created this birthday card using some precut window cards that I also found at Michael's. What a steal...eight cards and envelopes for a dollar!! I just love a great craft buy. Anyway, I cut the wonderful chocolate cake using my "Just Because" Cards Cricut Cartridge. The cake is cut at 4 1/2 inches. I decorated my cake with some "chocolate" glitter glue from Studio G. I added a cherry on top using some red Stickles. I added two chocolate brads from Creative Imaginations and embellished the card with some ribbon from the Ribbon Boutique. The background cardstock is from a scrap that I had leftover from my DCWV The Homemade Christmas Stack. I hate to let anything go to waste!! The inside of the card reveals the remaining message from the stamp and is embellished with some birthday stickers from Karen Foster. I used both chocolate and cream colored cardstock for the background. I think this card looks yummy enough to eat :) !! Have a wonderful day! Patty
Subscribe to:
Posts (Atom)