Showing posts with label Glue Dots. Show all posts
Sunday, November 6, 2011
Cricut Imagine More Cards: Happy Birthday!!
I created a quick and simple birthday card using my Cricut Imagine and the Imagine More Cards cartridge. I used the print and cut feature and sized everything at four inches. I then separated my layers. I took a precut white card and used some blue polka dotted paper from the DCWV. I then used a photo cardstock background in a pretty pink pattern that I adhered to the paper using Glue-dots. I layered my diecuts using foam adhesive squares. I added a little glitz to my candle flame using orange glitter glue. I finished the card with a nice coordinating bow from the Ribbon Boutique and some glitzy sequins from a recent yard sale find! This birthday card took just a few minutes to make and I think it turned out very nice. Hmmm, my sister has a birthday this week...may have to put this one in the mail tomorrow!! Thanks for stopping by! Patty
Sunday, September 25, 2011
Cricut Imagine Christmas Stocking and Card Using Snow Angel
I picked up a copy of Scrapbooking magazine at Hobby Lobby yesterday. I found a great idea posted by Kimber Jepperson using the Cricut Imagine Snow Angel cartridge. She created large stockings from one of the designs and stitched them together to hold all kinds of goodies!! I thought this was a great idea, so I "scrap-lifted" it and decided to create not only a stocking, but a matching card. I cut one stocking using the fit to page feature on white cardstock. I then flipped the image and cut another stocking also using the fit to page feature. I used my trusty Bernina sewing machine (she's been feeling neglected lately due to my paper craft craze) to stitch the stocking together using white thread. I reinforced the stitching on each end. I embellished the stocking with some stick-on pearls and dried flowers from Recollections. I added a couple of little, pink roses from Treasures by Shabby Chic. I then created a nice matching bow from ribbon by Dashes, Dots, and Checks. I then suspended a cute, little deer ornament from the Seasonal Shoppe from Hobby Lobby. The embellishments were adhered to the stocking using Pop-Up Glue Dots. I then stuffed some tissue paper into the top, but that's just until I decide to stuff it with goodies!!
The matching card was created using a pre-cut card from the dollar bin at Michael's. I just love these tag cards. I used some glittery paper from DCWV as my background, cutting it to fit the card. I cut my stocking at 3 inches on white cardstock from the Snow Angel Imagine cartridge. I adhered it with Pop-Dots, again adding a little tissue paper into the top. I used the Recollections pearls to embellish and the pink roses from Treasures by Shabby Chic. I tied a cute little bow from the Dashes, Dots, and Checks ribbon and created a "hanger" using the same ribbon. I created some little, pink and white pearls on the stocking using Ranger Liquid Pearls. I think the card coordinates very nice with the stocking that will be filled with Christmas goodies for my someone special!! Thanks for looking!!
Patty
Sunday, September 18, 2011
Using the Yudu CardShop to Create Beautiful Cards.
I got a great deal on a slightly used Yudu CardShop and got some time to practice with it today. I used the included screened images with black ink on white cardstock to create both the birdcages and the sentiments. I then layered the designs with white on black cardstock. I used my Martha Stewart punches to create the borders and added some diamond and silver brads from Recollections. The black and the silver ribbons are from the Ribbon Boutique. The cards are put together with a combination of glue sticks and Glue Dots. I can't wait to purchase some blank screens so that I can start screen printing my own designs on cards. I'm not that great with ink and stamping so I think this little gadget has so much potential! Thanks for looking!
Patty
Thanks "Sew" Much Card
Here is a thank you card made for my sister who gave me a really special birthday gift. I used my Country Life Cricut Cartridge for the die-cuts and my Best Friends Imagine Cartridge for the paper designs. I used Bazzill Basics Paper Premium Textured Cardstock for the card. I then adhered a square of Cloud 9 Design Specialty Double-Sided Cardstock for the flowered background. I then used a light blue precut photo mat by Heidi Grace. I adhered my die-cuts to the mat using foam adhesive squares. I shaded my quilt just a tad using my Copic Cadmium Yellow marker. I then embellished the die-cuts with silver glitter glue, for the needle, and my white Gelly Roll pen for the stitching. I cut my tag from the same Bazzill cardstock and border punched it with my Fiskars punch. I printed the wording off on plain, white paper and then used some Pebbles chalk to add some color. I used a regular ball point pen to create stitches around the tag and quilt. I topped this card off with a few buttons from my sewing stash, which are adhered with Glue Dots. I then added a bow made from ribbon from the Ribbon Boutique. I hope my sister likes her card as much as I liked my present!! Thanks for looking!
Patty
Saturday, July 9, 2011
Card and Gift Bag Combination
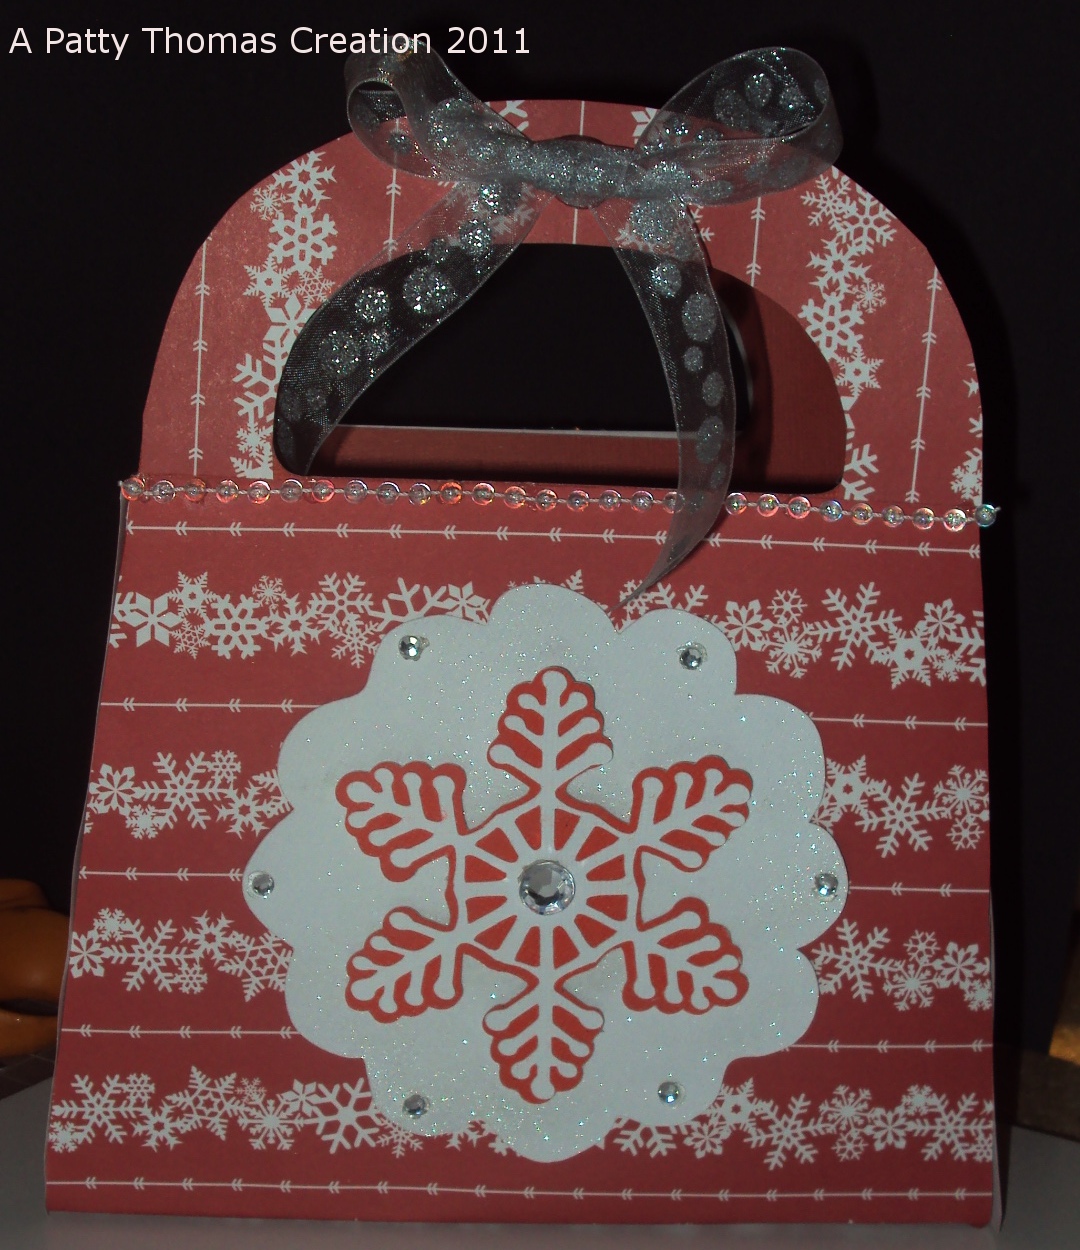
This week I've been busy working on some book reviews as part of my summer job, thus my cardmaking has gone slightly by the wayside. Last night and today I gave my self a break and sat down with my Cricut Gypsy. Back in the spring I took advantage of a deal to get seven free cartridges with the purchase of a Gypsy. One of those cartridges was Tags, Bags, Boxes, and More. I experimented last night making a couple of bags on the 12X12 mat. I just wasn't pleased with their tiny size. Perfect for a gift card or ring box, but not a sizeable bag. I rustled up some 12X24 paper and went to work this morning. The pictures show what I came up with. Using the larger paper and mat, my gift bag is now around 7 1/2 inches wide by 6 inches tall (8 1/2 with the handle). I found some wonderful plain "tag" cards in the dollar bin at Michael's and used one of those to create a matching card. I really like these tag cards. I always like to display my holiday cards and these have a prepunched hole perfect for hanging with ribbon or beads. Okay here's my "recipe" for the bag and card:
Bag:
I used one piece of red 12X24 cardstock from The Paper Studio cut at 22.75 X 11.58 (these sizes were created on my Gypsy). I then traced around the outside of the bag to put my snowflake pattern paper, from Recollections, in place. This also gave the bag a little more stability. Everything was put together using an Elmer's gluestick and Glue Dots to reinforce the bag seams. I embellished the outside by cutting a doily from the Cindyloo cartridge at 4.5 inches using white cardstock. I sprayed the white cardstock with sparkle Sheer Shimmer Spritz. I then cut a snowflake and background from the Winter Lace cartridge at 3.5 inches each. I added some sequins from Recollections and some bead trim and a bow. The bead trim was from RibbonFx and the ribbon from the Ribbon Boutique.
The Card:
As I've already mentioned, the card comes from Studio G. I adhered my snowflake patterned paper with a gluestick and then spritzed the exposed white area with sparkle Sheer Shimmer Spritz. I used Cindyloo again to cut a doily at 2.8 inches. Winter Lace provided me with the snowflake and background, cut at 1.8 and 2.1 inches respectively. I then added the same theme with the bead trim, ribbon, and sequins, using Glue Dots to hold everything together.
I know it's a little early for the holidays, but this crafting activity has me thinking of cooler weather as we hit 90+ temperatures and elevated humidity today!!
Have a wonderful rest of your weekend!!
Patty
Wednesday, June 29, 2011
Happy Sweet 16!!
Card Exterior
Card Interior
I whipped up this little card for my neice's sweet 16 birthday. Again, I'm stuck on the beautiful doily images on the Cindy Loo Cricut cartridge. I used those on the front of this card cut at 4.5, 3.5, and 3 inches for the doily and backgrounds. I used the Wildcard cartridge to create the lettering. I was able to weld my e's together using Cricut Design Studio. I had been wanting to try to weld letters/images and this was my first easy attempt and YEAH!! it worked! The beautful paper is from Cloud 9 design and the ribbon is from Offray. I used some pearl stick-on accents from the dollar bin at Michaels. The stamped images are clear stamps from Inkadinkadoo and I used Adirondack ink in Cabin Fever to stamp the images. I finished the card by spraying it with sparkle Shimmer Spritz. The inside message is cut using a border punch from Fiskars. It includes the same stamped images as the outside of the card as well as the pearl accents. All card components are put together using regular and pop-up Glue Dots. Thanks for stopping by and have a wonderful 4th of July!!
Friday, June 24, 2011
Walk With Nature......
I love the images on the Cricut Lite Wildlife cartridge. The animals on this cartridge are so realistic. Even though this cartridge doesn't have all the "bells and whistles" as a full cartridge, I can immediately see that it is going to be one of my favorites and most used! Today I created a nature-themed birthday card. I used paper from atd. It is from their Retrospection Specialty Collection. I think it matches nicely with the deer featured on this card. I used brown and black cardstock to cut my doe and fawns. I cut the image and shadow at 4.5 inches. I then used Pebbles chalks, my Copic markers, and my Gelly Roll pen to add some highlights to them and the grass. I used pop-up Glue Dots to make them stand out from their nature-themed background. My stamped phrase is from a Close to My Heart clear acrylic stamp. It comes from the Animals, Outdoors, Travel collection. I used Adirondack Cabin Fever Ink to stamp the phrase. I then sprayed the card with Shimmer frost spray. I can't wait to try out some more animal images from this cartridge. Have a great weekend!
Patty
Thursday, June 23, 2011
Another Cindy Loo "Hello" Card! (with help from Serenade and Preserves)
I was rather pleased with my first card using the Cindy Loo Cricut cartridge, so I decided to try another. I used the same "Hello" phrase and this time included paper from one of my favorite cardstock stacks: The Mariposa Pack from DCWV. The doily is cut at 4.5 inches from the Cindy Loo cartridge using black cardstock. I adhered the doily to a background piece of Mariposa paper. I then used my Preserves cartridge to cut labels ranging in size from 4 to 2.5 inches. I glued my layers together and then attached them to my doily background using pop-up Glue Dots. I then cut a little 2 inch butterfly and shadow using my Serenade cartridge. I cut my "Hello" at 1.5 inches using black cardstock. I added a little black blow and used clear Stickles to glitz the black cardstock just a tad. I think the Mariposa paper combined with the Cricut diecuts are a perfect match! Thanks for looking!
Patty
Patty
A Little Birdy Says Hello!
I was cleaning my craft room yesterday and stumbled across an unopen package of scrapbook cardstock. I was anxious to try out my Cindy Loo Cricut cartridge, so I went to work on this card. The doily and background are cut at 4 1/2 inches. The little bird and all his "parts" are cut at 1 3/4 inches and I flipped this image on my cartridge. The "Hello" message is also from this cartridge and it was cut at 1 inch. All of the cardstock is from Pressed Petals and it is from their English Garden collection. The brown bow came from my scrap drawer! I just love it when I can put bits and pieces from that drawer to good use! I used some brown glitter glue to accent my birdy and my "Hello". I used pop-up and regular Glue Dots to put everthing together. Hope you have a great week....seems that this will be a rainy day for crafting!
Thanks for visiting!
Patty
Thanks for visiting!
Patty
Saturday, June 11, 2011
Happy Birthday to My Favorite Cowboy!!
My husband's birthday is this week and he is the ultimate cowboy. He has the Stetsons, the Wranglers, the boots, you name it!! So I think he'll like this card!
I started with background paper from the Paper Studio and adhered it to a plain, white, standard-size card. Using my Cricut Old West cartridge, I cut the letters at one inch. I then cut the centerpiece with black cardstock at 3 inches and white cardstock at 2 inches. I embossed them with my Cuttlebug embossing folder. I cut the horse at 3 inches and embossed him using a different folder. I cut background rectangle strips in black and white and topped them with a piece of ribbon from the Paper Studio. I used a couple of black and silver brads, from Recollections, on each side of the centerpiece. I then tied a cute little jute bow and adhered it with Glue Dots. To finish up the card I added a small silver brad, from Colorbok, to each corner of the card. This was a fairly simple and quick card to put together, but I'm sure it'll make my favorite cowpoke proud!
Saturday, May 7, 2011
A "Deer" Mother's Day Card: Using Fabric to Make Card
I've already given my mom one Mother's Day card, but I don't think she'll mind receiving another! I was playing around at my craft table this afternoon when I came across a fabric remnant I had used in a lap quilt several months back. You may recognize the fabric if you have visited the fabric craft page of my blog. I decided to cut out a scrap and see how it would work on a card. I ran the fabric square through my Xyron sticker machine and then adhered it to a piece of layered cardstock. I used a nice evergreen tree pattern from the atd Great Outdoors Scrapbook Kit as the background for the rest of the card. I added some brown ribbon from my scrap drawer and then attached some tiny bronze brads from Recollections. I accented the other side of the card with a metal tree from Darice's Rustic Accents and glitzy brown stickers from K & Company. The card was put together using Glue Dots. I think the fabric piece made a nice card. Hope everyone has a wonderful Mother's Day!
Patty
Patty
Wednesday, April 20, 2011
A Mountain View And A Little Brown Church
I love the new Smoky Mountain-themed cardstock I found during Spring Break. I created a card last week and I've used it in two new cards this week. The first card is created use a wonderful, blue-patterned cardstock from Cloud 9 Design. It is from their Cocoa Mint collection. I cut my mountain image from the Smoky Mountain cardstock and adhered it to squares of white and black cardstock. I then used a vellum quote from Best Occasions that matches the image perfectly. I anchored it to the same black and white cardstock using silver brads from the Paper Studio. I added a white ribbon bow from Hobby Lobby and finished my mountain-themed card with a couple of silver tree brads also from the Paper Studio. Everything was put together using Glue Dots (another one of my favorites!).
Patty
Wednesday, April 13, 2011
Beautiful Dogwoods In Bloom
The dogwood trees are in full bloom in the mountains around my little rustic cabin. Seeing the spectacular colors of the trees and wildflowers made me want to try to incorporate this beauty into a card. I was at my cabin just this afternoon and snapped a few photographs with the digital camera. I was anxious to use these pictures to create a card so I loaded them up and printed them out as soon as I got home. I think they turned out nicely and I'll be using many of them in future crafty creations. I used dark brown cardstock from Colorbok and added a nice background in an olive green cardstock, from Best Occasions, cut from my Cricut Spring Holiday Cards cartridge. The background was cut at six inches and fit my five inch tall photograph just fine. I used Glue Dots to adhere everything together. I added some tiny square, bronze brads from All My Memories. I then finished this card with some matching "Happy Birthday" ribbon from Martha Stewart. I just love the way this card turned out! Hope you like it too!! Thanks for looking....Patty
Sunday, April 10, 2011
A Smoky Mountain Thank You
Over my much awaited Spring Break week, I paid a visit to the nearby Your Scrapbook Superstore and Clearance Center in Pigeon Forge, Tennessee. This store isn't very far from my home, but I have never had the chance to visit. It's a scrapbookers and cardmakers dream! The store is packed with loads of paper, stamps, punches, stickers, etc. My favorite part was that it sells many items related to the beautiful area that I live in. I found some really beautiful rubber stamps and papers with mountain, nature/wildlife-related themes. I found this wonderful scrapbook cardstock which I used to create a beautiful thank you card for some really nice people. Each page of the cardstock contains numerous images of different aspects of the Great Smoky Mountains. I plan to use each image in a future card. The cardstock is available in either black/white or brown/white. I cut out the image used in this card and adhered it to white cardstock that I then layered onto a black card. I used my Cricut Wild Card cartridge to cut the "Thanks". The word is cut at 5 1/2 inches. After adhering the word to black and white cardstock, I used adhesive foam squares and Glue Dots to adhere the entire "Thanks" to the card. I embellished the wording with a couple of round, silver brads from Recollections. I used my Gelly Roll white pen to enhance the word, as well. The inside of the card contains a white on black theme where I plan to write my special "thank you" message. By the way, here's the link to the local store I mentioned, they do have online ordering capabilities: Your Scrapbook Superstore
Thanks for visiting!
Patty
Thanks for visiting!
Patty
Sunday, March 27, 2011
Spring Birthday Surprise!
On a recent shopping trip to Michael's, I found these wonderful bifold cards at a great price. My creative wheels started turning. I have a friend with a birthday this week, so I decided to craft her a wonderful Spring- themed card. The adhesive borders as well as all of the die-cut embellishments are from DCWV. I used a pink flower head from a floral stem I recently found at a local dollar store. I attached it with a tiny, pink brad from Colorbok and dabbed it with just a little crystal Stickles. I cut small slits in each side of the card to attach the bright pink ribbon. I adhered the ribbon to the inside of the card using Glue Dots.
When you open the card, you see a sweet, pink butterfly, which was cut using my Give A Hoot Cricut cartridge. The butterfly and shadow were each cut at 2 1/2 inches. I accented the butterfly's wings with the crystal Stickles. I used a simple "Happy Birthday" stamp as my greeting for this card. I hope this dear friend likes her card and has a wonderful birthday.
Tuesday, March 22, 2011
Gardening Time!!
I love to work in my garden just about as much as I love to work in my craft room! The warm weather the last few days has found me playing in the dirt. Just this afternoon, my garden was plowed by my wonderful father-in-law and I was able to plant some seeds. I started with just a few lettuce, radish, and carrot seeds but ended up planting two rows of onions and a row of red potatoes! I also sprinkled a few beans in the dirt.....I know its a little early so I didn't want to put out too many beans (still a danger of frost until late April)!! Anyway, back to my most recent card. I incorporated my love of gardening into this birthday card and hopefully the recipient will find great enjoyment from it! I used a precut, cream-colored card and cut a piece of brilliant blue scrapbook paper to fit the front. I then used my recently purchase Serenade and Mother's Day Bouquet Cricut cartridges to cut the flower pot and overlay(3 inches) and the leaves(2 inches). The overlay for the flower pot is made from paper from the DCWV Flower Shower Spring Stack. This pad has 180 sheets of the most bright and cheery 12X12 scrapbook paper. I used some jute twine to create my ribbon and bow. I used Glue Dots to adhere my flower pot to the card, but was careful not to glue the top of the pot. This allowed me to insert my seed packet so that the recipient would have no trouble removing it. The seed packet fits just snugly enough that it won't fall out. I found the diecut stamp in my Martha Stewart School Days Multimedia pad. I used a single-hole punch and adhered it to the jute. The tiny glitzy butterfly is one of those little objects that I had "saved for later" and I thought it looked very nice for this card. The inside of the card includes a nice little stamped message. The stamp was found in one of those wonderful dollar bins at Michael's. Hope this card puts in you in the mood for some gardening......Have a great week! Patty
Subscribe to:
Posts (Atom)