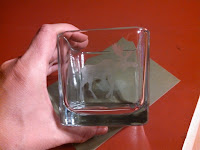
 I've been surfing Pinterest again!! Recently I've come across lots of projects using glass etching cream and yard sale/ thrift store glass dishes. This weekend I paid a visit to Hobby Lobby and used my 40% off coupon on the large container of Armour Etch glass etching cream. I also stopped by the dollar store and picked up some latex gloves and a $1 candle holder to practice on! While perusing the aisles of Hobby Lobby with my hubby, I was pleased to find the Cricut accessories at 30% off and they had my "wished for" cartridge! With just a little encouragement from my husband, I picked up the Mountain Man cartridge and departed the store with Cricut cartridge and etching cream in hand. This afternoon I took advantage of some time to craft. I used my Cricut Expression 2 to cut some small wildlife images from the Mountain Man cartridge. I used white contact paper to create my stencil and the "kiss cut" for vinyl. I normally would use the animal cut-out, but not for this project, you use, I suppose what is called, the negative. I etched one side of the candle holder at a time, leaving the etching cream on anywhere from five to ten minutes. I made sure to wear my rubber gloves while applying the etching cream and while rinsing it off. I read that the etching cream can create some nasty chemical burns!! I also made sure to clean each side of the candle holder really good with rubbing alcohol, then drying it with a paper towel, before applying my vinyl stencil and etching cream. I rinsed the cream off with tap water and then dried thoroughly. I repeated the process for each animal stencil. I was really proud of my first attempt at glass etching and can't wait to try it on some more projects!! Have a great week and thanks for stopping by!! Patty


I have had great success with duct tape and the etching cream. Much cheaper than the vinyl and the cricut cuts it well.
ReplyDelete